Quick Links
- Section 1: Welcome to the iFi DEX
- Getting Started
- Adding iFi DEX Ethereum testnet to Metamask
- Adding iFi DEX Testnet to Metamask
- Getting testnet tokens
- Section 2: Exploring the iFi DEX
- Bridging testnet tokens into iFi DEX
- First swap: get some gas tokens
- Second swap: all the other tokens
- Liquidity pool overview
Welcome to the iFi DEX experience
Thank you for participating in the iFi DEX testnet! Below are the steps to get started and will serve as a general guide on how to explore the iFi DEX. Beyond the general instructions, please feel free to explore and get creative. If you encounter any issues during testing, we would ask that you report them.
Getting Started
Before you begin, you will need to add both the iFi Ethereum Testnet and the iFi DEX Testnet to Metamask.
Adding iFi DEX Ethereum testnet
To begin you will need to manually add the Ethereum testnet to Metamask. To do this, open up your browser and then the Metamask extension.
Click on the Network drop-down menu in the upper left and scroll to the bottom where you will see the option to “add a custom network.”
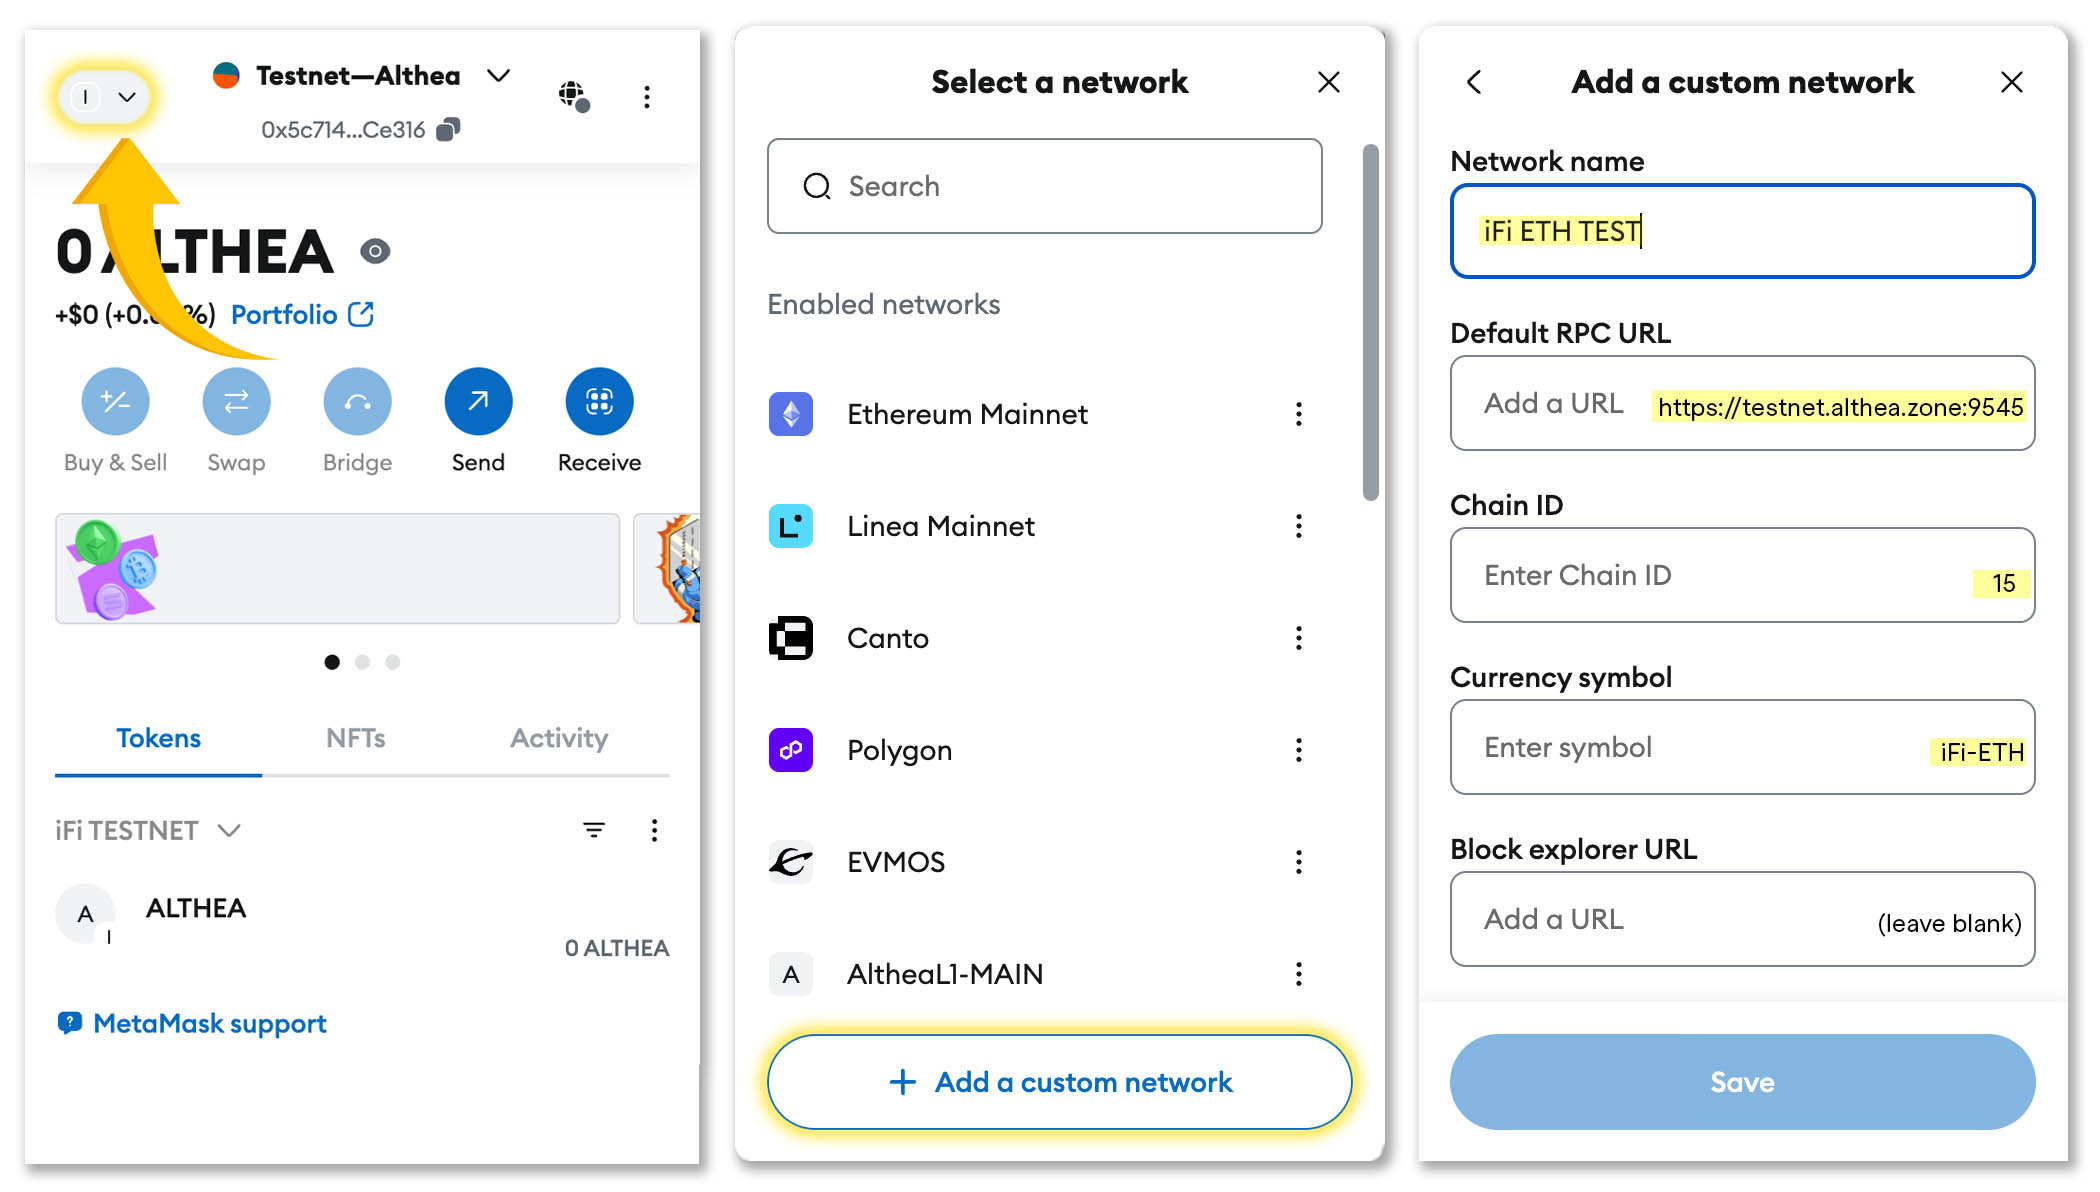
Fill in the the various fields with the following information (as pictured above).
| Field | Input |
|---|---|
| Network name | iFi ETH TEST |
| Default RPC URL | https://testnet.althea.zone:9545 |
| Chain ID | 15 |
| Currency Symbol | iFi-ETH |
| Block explorer URL | (empty) |
Adding iFi DEX Testnet
Unlike in the last step, we can use the testnet portal to add the iFi testnet to Metamask automatically. To do this, navigate to https://test.althea.link.
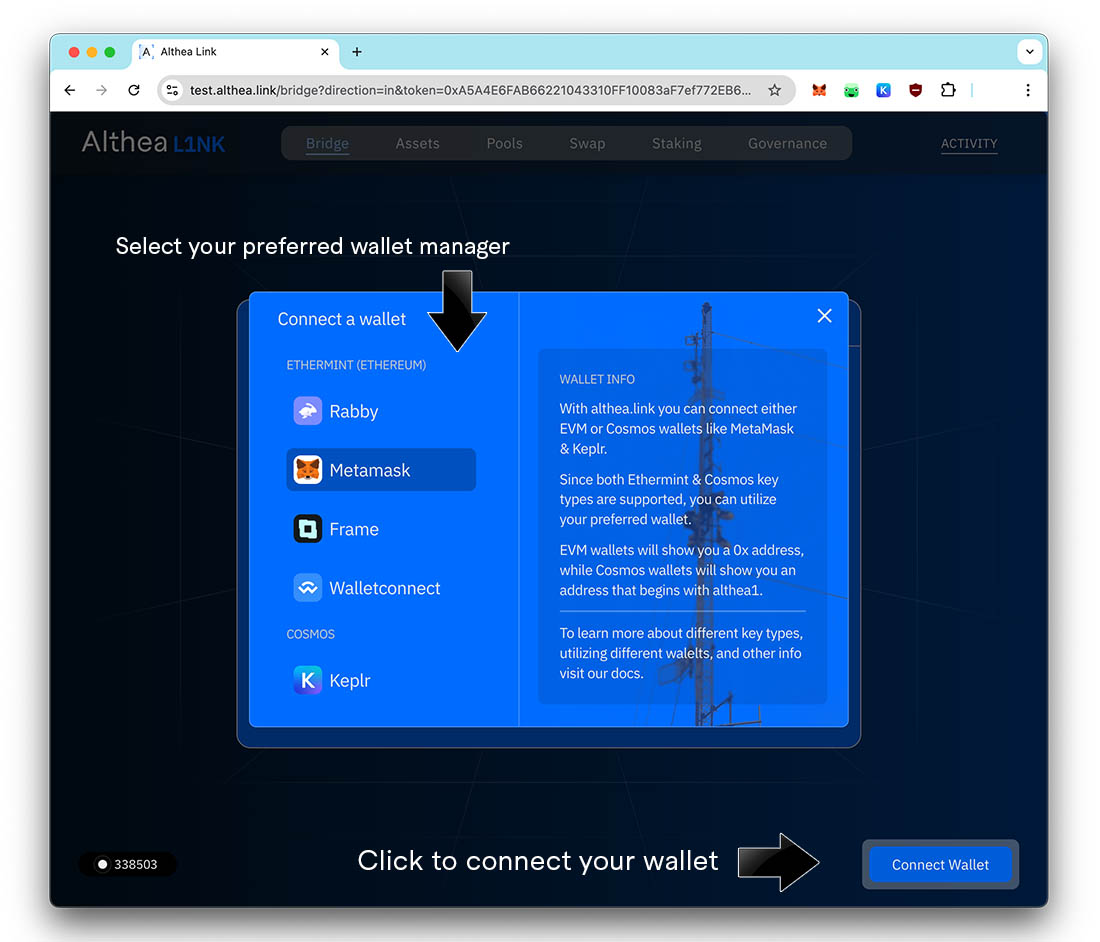
- Click on “connect wallet”
- Click on Metamask
Metamask will pop up and ask if you would like to add the network. Click APPROVE. After you have approved the network, you might find it easier to rename it, so it does not get confused with Althea mainnet. You can do this from the network drop-down menu as well.
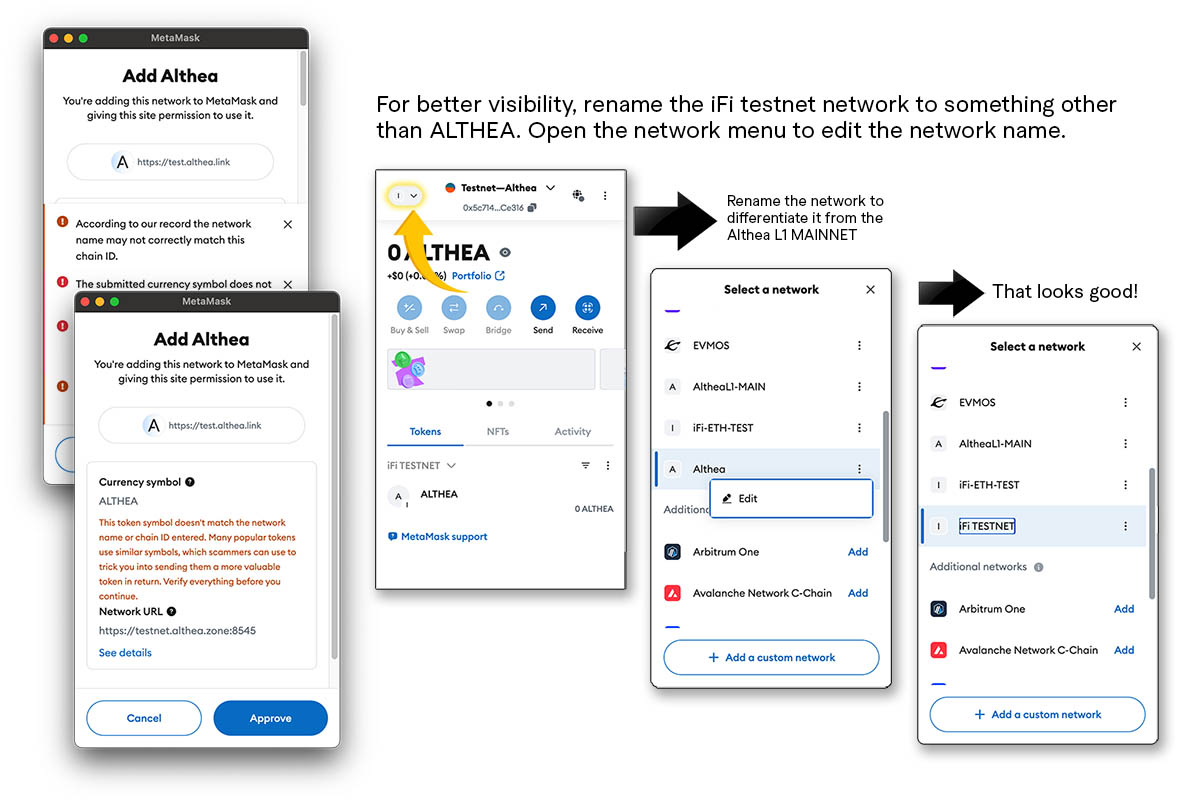
There we go. Both networks added. You’re almost ready to go, but first you’ll need to get some testnet tokens.
Getting tokens
To begin you will start with 100,000 USDS-testnet tokens, serving as ersatz USDS, which you will need to bridge from the ETH testnet onto the iFi DEX testnet. From there you can use the swap page to turn your USDS into other tokens to use on the DEX.
If you have already filled out the iFi DEX sign-up form, but did not include your testnet address at the time, navigate back to the iFi DEX Testnet signup form that you have already filled out.
Click on “edit my response” and be confirm that the question asking for your ETH TESTNET address is filled in. If it is not, please paste your address here and save your form response.
Now sit back for a moment and wait for your tokens to arrive. You will receive a tag in the #iFi DEX Testnet channel on the Althea L1 Discord server when your tokens have been dispensed. If you have not received your tokens within 24 hours, ask a moderator in the channel to double-check your submission.
Explore iFi DEX
Now that you have received your testnet tokens, the first step is to bridge them from the Ethereum test network onto the iFi DEX test network.
Bridge into the iFi DEX test network
To beging, navigate to the test portal: https://test.althea.link. If your wallet is not already connected, click on the “connect wallet” button in the lower right.
Now click on the BRIDGE tab on the upper navigation bar.
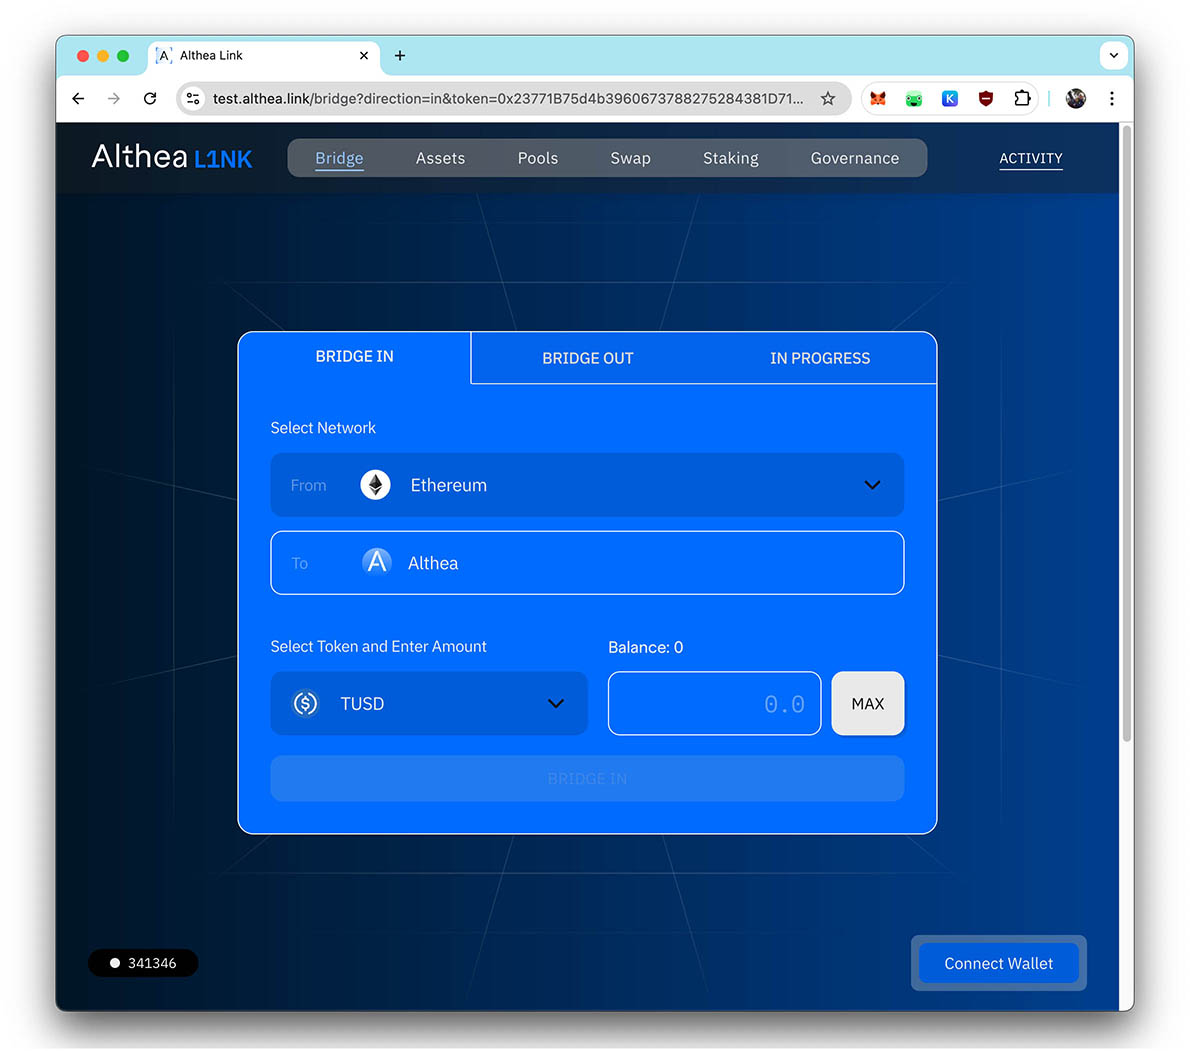
Note that the source network (from) should be Ethereum and the destination network (to) should be Althea (as pictured above). Select the token to bridge in, in this case USDS, and bridge the maximum amount possible.
Time to get some Althea tokens!
iFi DEX supports both standard and gasless swaps. Generally you will want to use standard swaps, covering gas with Althea tokens—but as you do not yet have any Althea tokens, we will perform a gasless swap to acquire some $ALTHEA tokens.
Gasless swaps are necessary if you do not have any Althea tokens for gas, but they are not free. A small “tip” is added onto the gasless transaction, to create an incentive for the relayer to pick up your transaction. The tip is paid in the the token being swapped.
On the upper navigation bar, click on SWAP to navigate to the swap page.
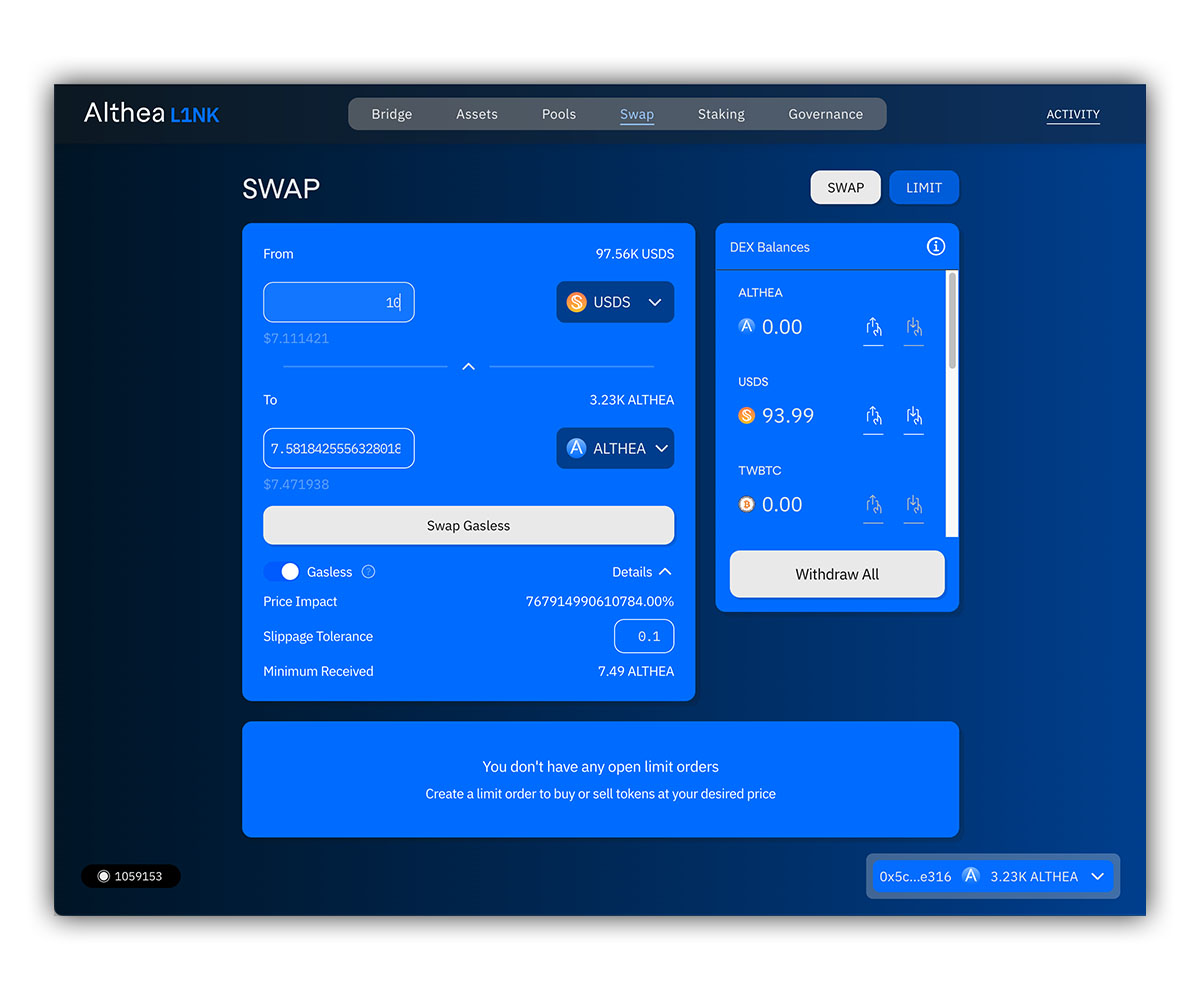
- Select the token you are swapping into Althea (USDS) using the upper drop-down menu.
- Enter the amount of USDS you wish to swap in the upper token field
- Confirm the TO drop-down is set to ALTHEA.
- Confirm that the Gasless toggle is switched to the right (enabled by default, note the action button will be labeled “swap” or “swap gasless” depending ont he toggle)
If everything looks good, click on the Swap Gasless button to initiate the swap.
Note the details drop-down caret. When clicked, this will display the predicted price impact, allow for slippage tolerance to be adjusted, and show the minimum amount that you will receive from the swap.
In the lower portion of the swap page, you will also see the open orders. Going forward you will also find order history and other helpful graphs and visualizations of DEX activity.
Let’s get some other tokens!
You are now free to swap your USDS into any of the other tokens available, in whatever amounts you would like. Which ones should you get? That’s up to you.
Why not put a pin in that for a moment and visit the iFi DEX Pools to find some inspiration.
Use the navigation bar on the top, click on Pools.
Plunge into the (liquidity) pools
The pools page displays the various available liquidity pools, to which you can add or remove different types of liquidity: ambient, concentrated, or knock-out (limit orders).
To understand more about the different types of liquidity and how they work, we recommend reading the, “Liquidity Fusion in the iFi DEX,” which gives a good overview.
Liquidity types, summarized
Ambient liquidity is traditional, “always available,” liquidity that you most likely are familiar with. Trades happen, regardless of price or liquidity, and prices fluctuate up and down (slippage). Ambient liquidity is important, but providing this kind of liquidity exposes the user to impermanent loss.
Concentrated Liquidity is different from ambient liquidity in that it is not spread out across the entire spectrum of possible exchange rates/prices. Providers of concentrated liquidity select a specific price range where they want their liquidity to be active. This makes the the liquidity that is provided more efficient—it’s only used for swaps in the desired range—but if the price moves outside of this range, the liquidity becomes inactive and swaps cannot execute (until the price returns within this range).
Knockout Liquidity is a type of concentrated liquidity position with a very narrow price range, begins with only one token, and is removed when it becomes entirely made up of the other token—this means that it acts as both a liquidity position and as a limit order. This allows buyers and sellers to make large trades with extreme efficiency, while simultaneously providing improved swap quality to regular traders. The downside is that it is not instant and requires buyers or sellers willing to fulfill the order/position.
Instructions on adding/removing liquidity
To begin, we will explore ambient and concentrated liquidity positions. On the upper toolbar, click Pools to navigate view the testnet liquidity pools.
Note: Knockout Liquidity positions (aka limit orders) are found on the swap page. We will return to that later.
In the upper portion of the page you will see the liquidity pools listed by their trading pair, the liquidity incentives represented in APR, total value locked (TVL) off the pool, and the volatility type.
You can also filter by stable- or volatile pool types. Stable pools are comprised of two stable coins, where the value of the pool does not change, even if the composition fluctuates in one direction or the other. Volatile pools consist of at least one token (or both) that is not pegged in value to a specific asset.
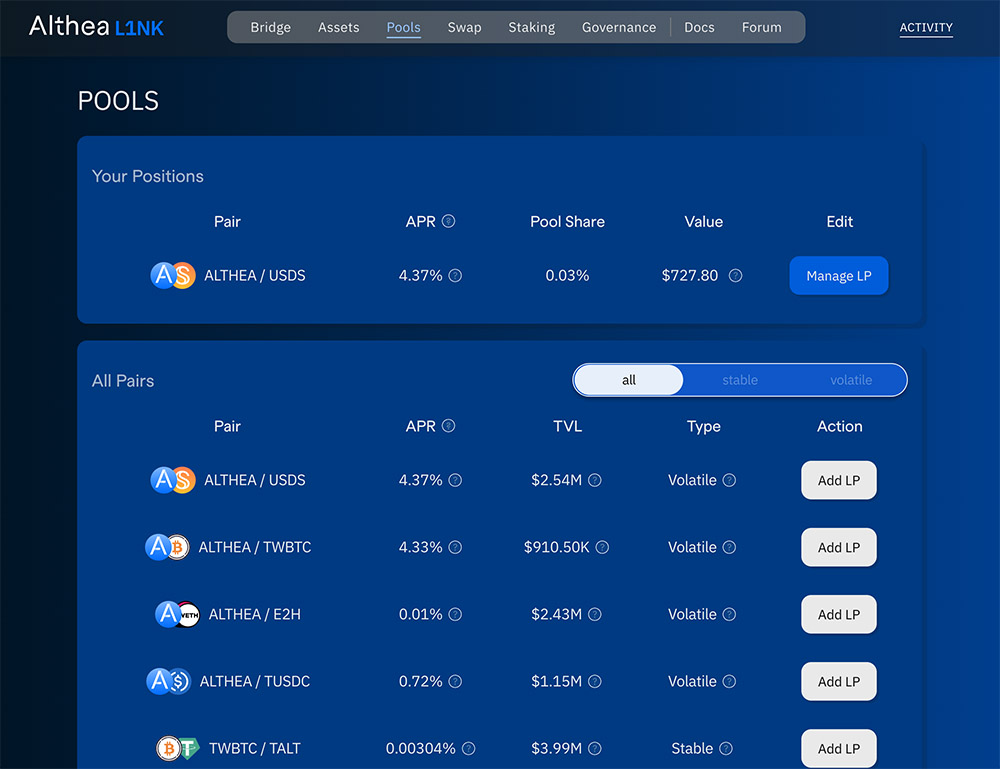
Once you create a liquidity position, you will find it listed at the top (see above), and can manage add, withdraw, or create additional positions in the same liquidity pool using the Manage LP button.
Creating an ambient liquidity position (i.e. adding ambient liquidity to an LP)
When you create an ambient liquidity position, you add liquidity by contributing equally valued amounts of the two token that comprise the liquidity pool (LP).
To do this, simply click on the Add LP button next to the pool you wish to add liquidity to. The Create New Position dialog box will appear giving you the option to select either Concentrated or Ambient.
For an ambient position, click the Ambient tab and then click the Add Liquidity button.
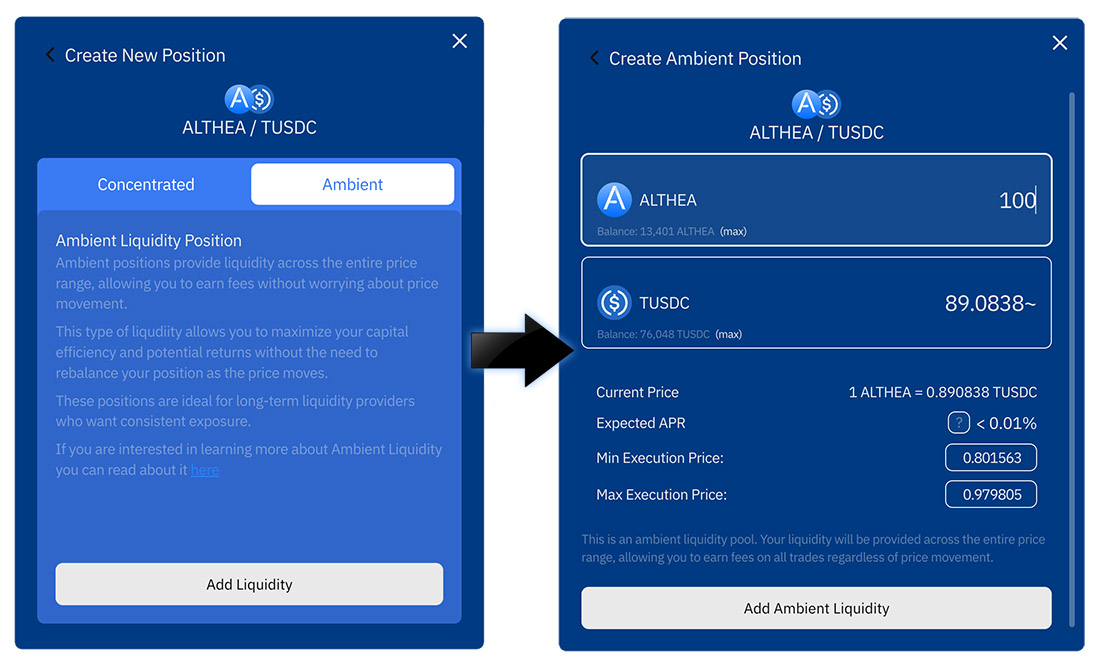
Now you can choose the amount of liquidity to add, in either token. The token amount you enter into either field will auto-balance in the other. You will need to have both tokens in your wallet in sufficient amount to create the position.
In the example above, you can see that 100 ALTHEA was entered and the other half of the trading pair was automatically filled in (89.0838 TUSDC). In order to create this position (i.e. add liquidity to the ambient LP) the user would need to have both 100 ALTHEA and 89.0838 TUSDC in their wallet.
Note also the current price (i.e. the current exchange rate between the two assets), expected APR you will earn from incentives and/or swap fees.
The minimum and maximum execution prices are displayed here, but are not relevant to an ambient liquidity position. As mentioned earlier, ambient positions provide liquidity across the entire spectrum of the potential price range.
Having done all that, enter the amount you would like to use to create the position, and click the Add Ambient Liquidity button and confirm the transaction.
Creating a concentrated liquidity position
To create a concentrated position (i.e. to provide liquidity within a predetermined price range), as before click on the Add LP button next to the pool you wish to contribute to, select the Concentrated tab and then the Add Liquidity button.
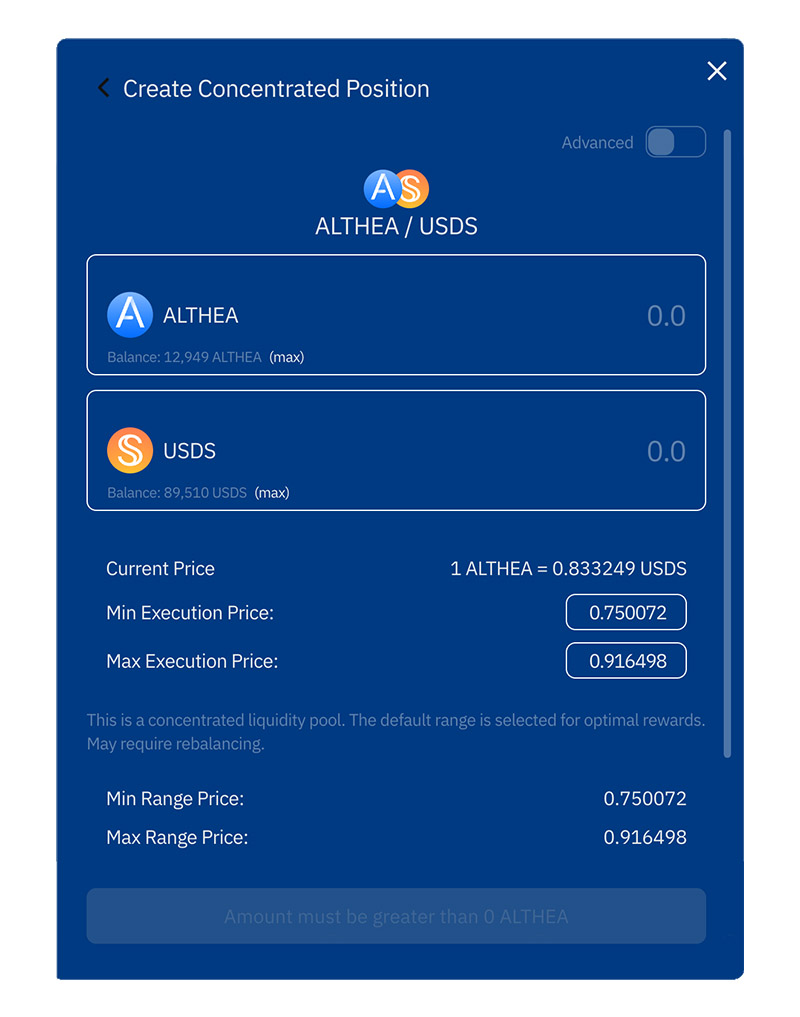
From here you can enter the amount of liquidity you would like to add to the LP. As with an ambient liquidity position, you can enter an amount of either pair, and iFi DEX will auto-fill the other half of the trading pair.
You can also adjust how concentrated you would like your position i.e. how narrow or wide the active range for your liquidity will be. This is controlled by adjusting the minimum and maximum execution price. Note that the minimum execution price must always be less than the current price, or iFi DEX will not allow you to create the position.
If you would like to further fine tune your concentrated liquidity, enable the advanced switch in the upper right.
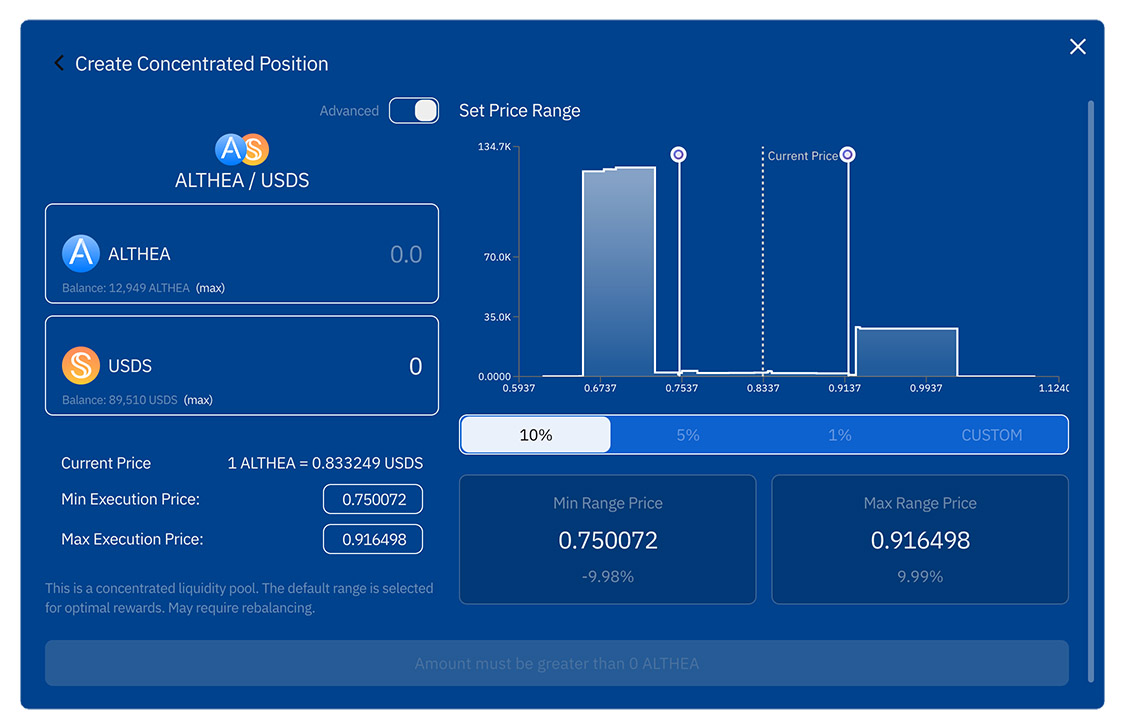
The advanced tab is a more comprehensive view for adjusting the spread of your concentrated position. There are presets (10%, 5% or 1%) to quickly set the price range or you can use the adjustable bars of the price chart (and/or manually adjusting the minimum and maximum execution price) to create a custom range for your position.
“It’s time to start LPing!” –Damon Killian
Now you can swap into any combination of tokens available on the iFi DEX and can also provide different kinds of liquidity to the various pools available and earn rewards from the liquidity incentives and swap fees.
As a challenge, you are invited to swap your testnet tokens into any combination of tokens available on the DEX and create liquidity positions—ambient, concentrated or knockout/limit orders—with the intention of maximizing the profit drawn from swaps made and fees collected.
At the end of the testnet, we will go through the results and create a leaderboard for the top performers.