Getting Started with your Althea Mini-Mesh Kit
Overview
Welcome! The Althea Mini-Mesh kit provides the tools you need to set up a small starter network, including the equipment required for a gateway Access Point and two users. Here are some initial instructions to get your mini-mesh kit lit up and passing traffic from router to router so you can begin exploring the Althea platform.
What’s included in your Mini-Mesh Kit
- Gateway router + accessories
- Gateway AP radio + accessories
- CPE radio + accessories (x2)
- CPE router + accessories (x2)
Setting up your Gateway
Gateway Router
This wireless router has been flashed with our software and will act as the hub for your mini-mesh network.
Please note: the reset button on your gateway router may wipe the Althea software, or return it to its un-configured state. You should never reset your gateway router without express instruction from Althea staff.
Router Setup
- Unpack router and assemble according to its instructions.
- Connect the router to a power source. Indicator lights on the front panel should begin to light up and ultimately settle with a solid light for the power indicator. If no indicator lights appear, double check the device is turned on (power switch in the back flipped towards the line).
- Connect the router to your internet source by plugging one end of the ethernet cable into a LAN port on your existing home/office router and the other end into Port 5 of your new gateway router (manufacturers typically label this port as ‘internet’ or ‘WAN’, see below). The Internet indicator should light on the front panel.
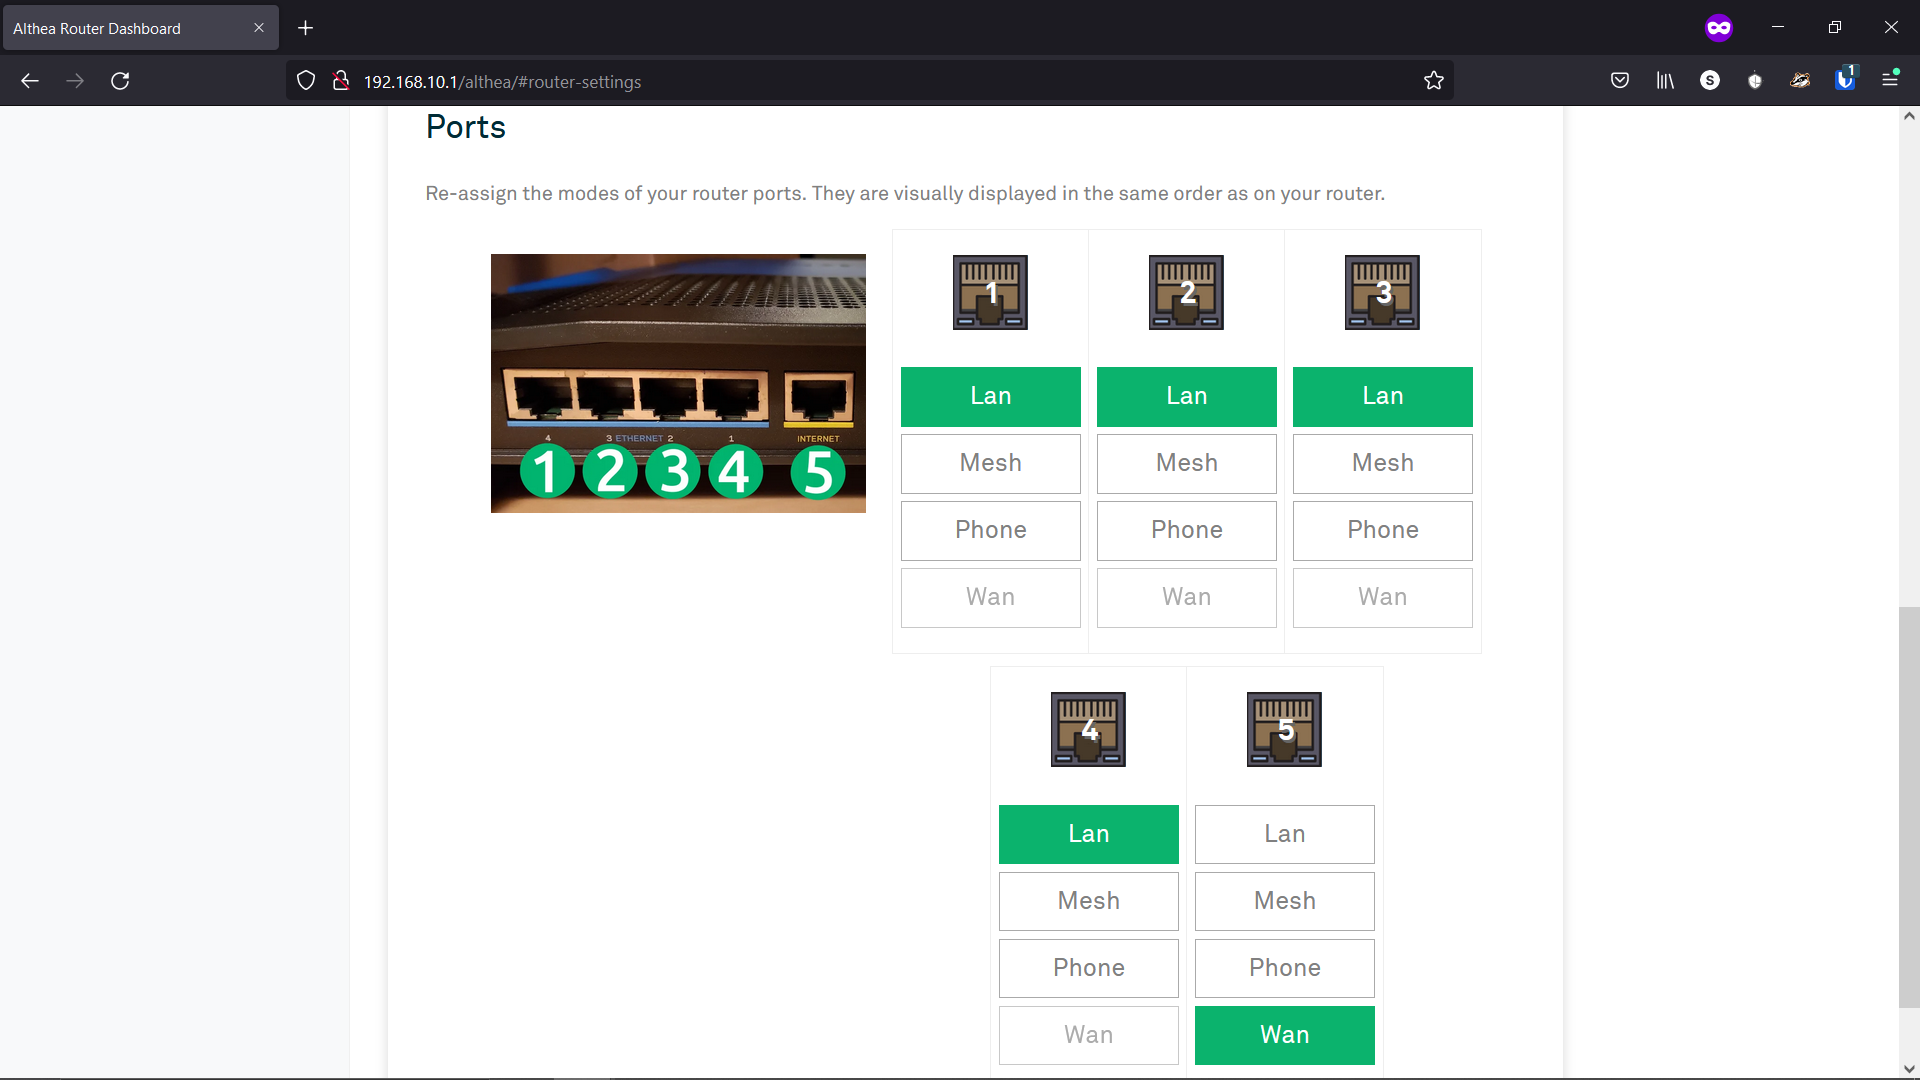
- Confirm your Internet connection by connecting via WiFi or with a physical ethernet connection to Port 1 (the port furthest from the Internet/WAN port). Your gateway router’s WIFI will appear as “AltheaHome-5” and “AltheaHome-2.4”. You may choose either and use the default password, “ChangeMe”. Try running a speed test, such as fast.com.
Router Settings
Most of the necessary router settings come preconfigured with your Mini-Mesh. However, there are a few settings you will need to customize for yourself.
- From your browser’s navigation bar, go to “192.168.10.1”. The Althea Dashboard will appear. We recommend doing this on a private or incognito browser session, to avoid any conflicts with browser caching between routers. Sometimes browsers will display an out-of-date cached version of the router dashboard, instead of the correct up-to-date version that you want to see.
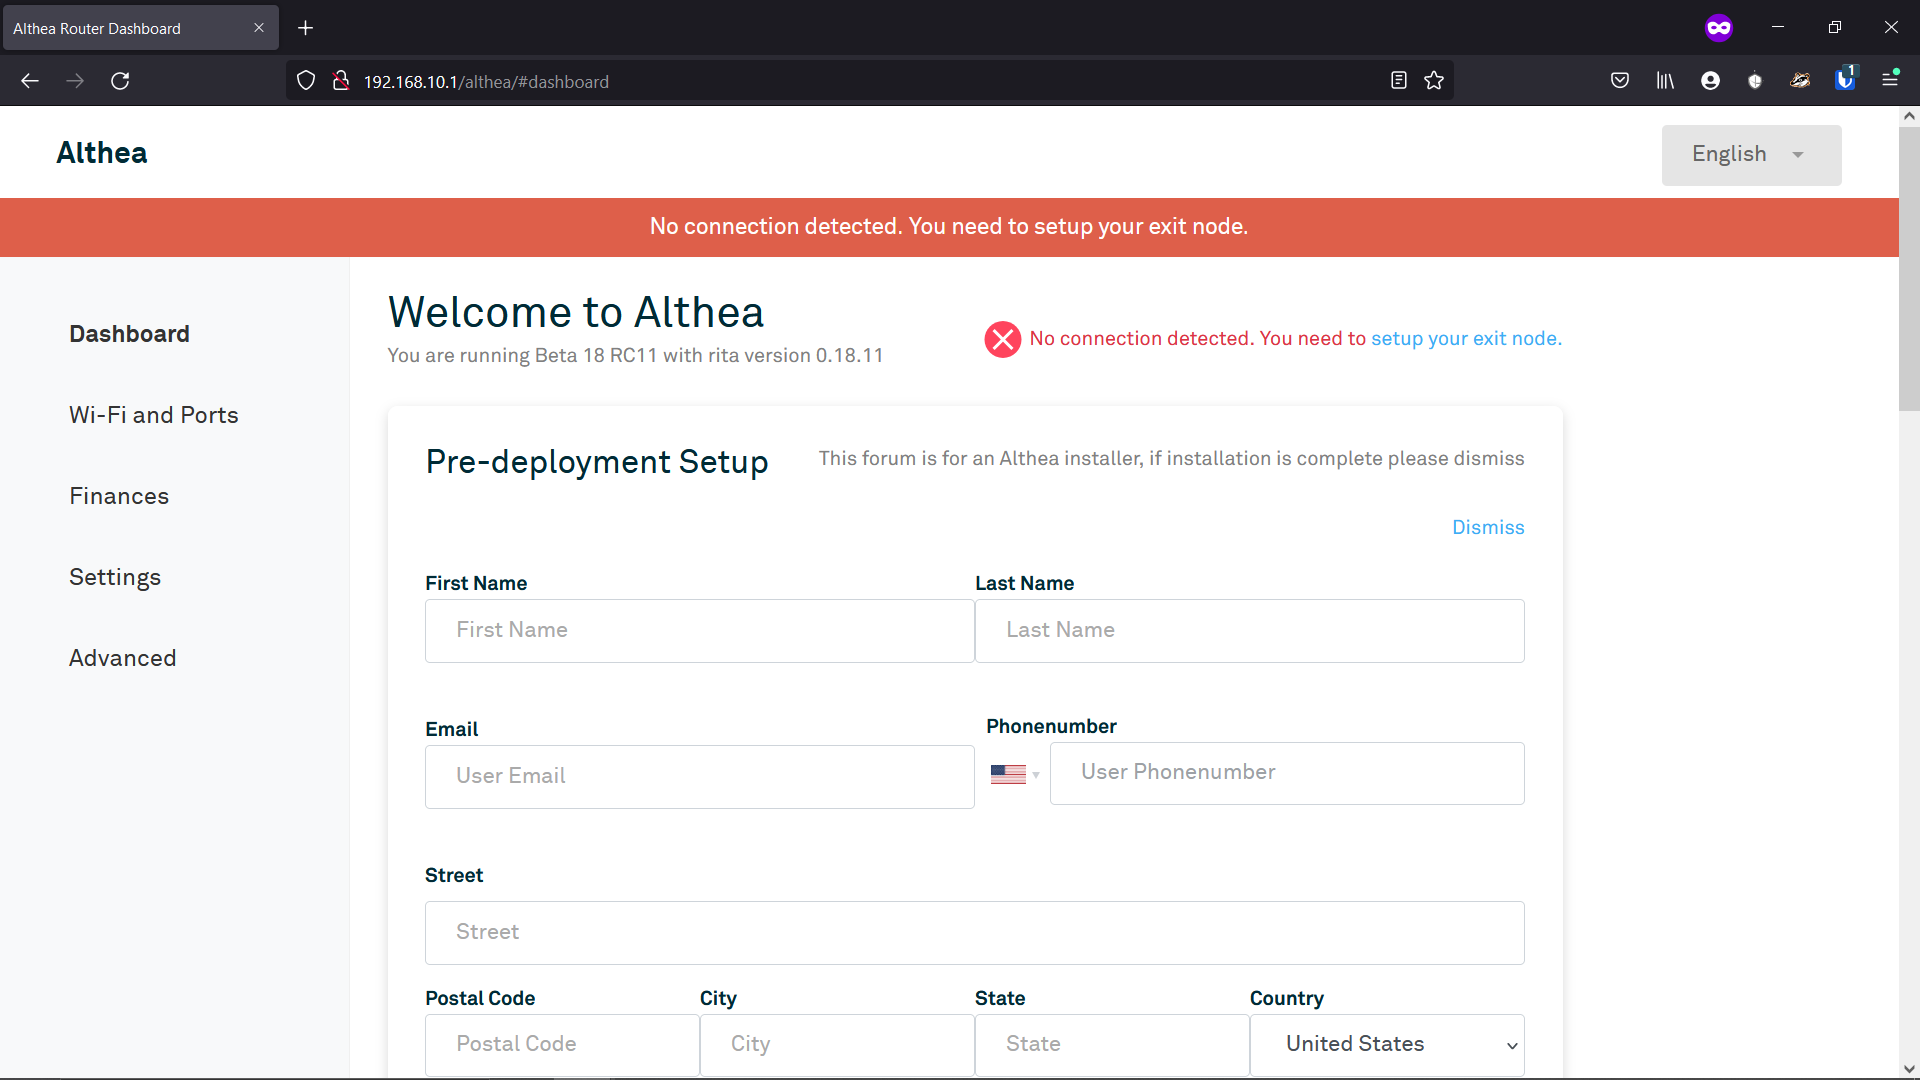
- From top to bottom, the Dashboard page contains:
Pre-Deployment Setup - This section is for your end user info and is optional for the setup of your gateway.
Getting Started - This section contains a to-do list of things we recommend when first setting up your gateway router. Some key list items are described below.
- Backup your wallet so you don’t lose your funds clicking this option will populate a window with your wallet private key. This should be backed up and safely maintained in a secure location, such as offline on paper or in an encrypted password manager, like BitWarden. All funds in a router’s wallet are associated with this private key. If the private key is lost, Althea staff cannot recover it, and those funds would be lost as well. Each time the Althea firmware is installed a new private key is generated. If a private key is compromised, there is a mechanism to wipe a router and reinstall Althea firmware with a newly generated private key.
- Update your wifi password - clicking this option will navigate you to the “Wi-Fi and Ports” tab where you can change your network name or password.
- Set your dashboard password - clicking this option will populate a window for setting a Dashboard password. This will allow you to lock admin settings and prevent other users from accessing this page.
Finances - At the bottom of the page is an overview of your router’s financial stats. This will populate with data as you continue to use your network. More financial information and settings can be explored in the “Finances” tab.
- After reviewing the Dashboard, you should navigate to the “Settings” tab. Here you may give your router a nickname, update your router credentials, update your contact information, update your exit node, check for firmware updates, and view debugging data. Note: the router credentials are the same as the “dashboard password” described from the Dashboard page, but can be updated on the SETTINGS tab.
The “Contact Information” section comes pre-populated with a generic number. This should be updated to your cell number (you must use a number that can receive SMS messages), and an email address. The information entered here will be used for the router notification and payment systems. This information will also be visible to Althea staff any anyone who has access to your Operator Tools dashboard
Althea Operator Tools
Now that you have the first router of your network online, it will be visible from Ops Tools. Since this tool will be key for monitoring, managing, and deploying your network, we recommend getting familiar with it as you set up your network. Start here with the “Operator Tools first login” section. At this point you may want to leave this guide and proceed through the “Operator Tools first login” steps, as Ops Tools will be a helpful verification and troubleshooting tool. Once those steps are complete, return to this guide.
Gateway AP Radio
Gateway AP Radio Setup
The provided gateway AP radio is pre-configured to act as an Access Point for the other two CPE radios (a.k.a. stations), with its own unique broadcast SSID. It will act as the hub for your gateway to communicate with the other CPE radios/routers and service them with internet access.
- Unpack the gateway AP radio. For the purposes of this initial bench test setup, you will not need the mounting hardware, only the gateway AP radio, the power cord and the PoE injector (Power over Ethernet) power brick.
- Connect your AP to a power source (surge protector recommended). Then take an ethernet cable and plug one end into the “POE” port of the power brick. Plug the other end into the ethernet port on the back of your AP radio. Once connected, the power indicator on the AP radio will light up.
- Connect your AP to your gateway router. Take an ethernet cable and plug one end into the port labeled “LAN” on the AP power brick. Plug the other end into Port 4 of your router (the port adjacent to the Internet/WAN port). Once connected, the ethernet indicator (next to the power indicator) on your AP should light up. Note, on some models of the Gateway router, ports are labeled backwards. Port 4 is the one closest to the “Internet” port on the router (Port 5).
Gateway AP Radio Settings
- First connect to your AP either directly to your computer, or via the device’s management Wi-Fi. If you are unsure how to connect to your AP radio, follow one of the options in How to Connect your AP Radio. Note: the AP device will provide a management Wi-Fi connection for 8 hours from the time it is connected to a power source. After that 8 hours, you will need to power cycle the device to connect to the Wi-Fi again. This management Wi-Fi network is only useful for configuring the device, it will no provide internet access
- Log into your device with username: althea and password: althearocks!
-
You should now be connected to your AP’s settings. Since the AP comes preloaded with Althea software and settings, there is nothing that must be changed for your AP to function in your network. However, there are some defaults that you may change:
a. Device login info (un: althea pw: althearocks!) Note: it is important that any changes to your login information are carefully noted. If lost, the only option for moving forward is to manually reset the hardware.
b. SSID comes default as AP1, but may be renamed
c. The device IP address has been set to 192.168.1.30 (and the CPE radios included with this kit have been set to 192.168.1.31 and 192.168.1.32 respectively). These may also be changed, but each radio must have its own unique address.
d. The device name also comes default as AP1 and may be changed.
Althea Operator Tools
Now that you have connected your first AP to your network, you may connect to it remotely from Ops Tools! This can be achieved with the Antenna Dash which is outlined in the Network Monitoring section of our Althea Operator Tools guide. Before moving forward in this setup, you should practice connecting to your new AP via Antenna Dash.
Setting up your CPEs
CPE, or Customer Premises Equipment, includes the router, radios, and accessories needed to set up your first user. This equipment comes pre-configured and connecting it to your gateway should be as quick and simple as your computer connecting itself to your home internet.
CPE Radio and Router Setup
- First unpack CPE1 radio. For the purposes of this initial bench test setup, you will not need the mounting hardware, only the radio, the power cord and the PoE (Power over Ethernet) injector power brick.
- Connect the CPE radio to a power source. Connect the power brick to the power cable and plug into a power source. Then take an ethernet cable and plug one end into the “POE” port of the power brick. Plug the other end into the ethernet port on the back of the CPE radio. Once connected, the power indicator will light up.
- Next unpack the CPE1 router and assemble according to its instructions.
- Connect the router to a power source. Indicator lights on the front panel should begin to light up and ultimately settle with a solid light for the power indicator. If no indicator lights appear, double check the device is turned on (power switch in the back flipped towards the line).
- Finally, connect the router to the CPE radio by plugging one end of an ethernet cable into the LAN port of the CPE radio power brick and the other end into Port 5, labeled “Internet” or “WAN”, of the CPE router. The Internet indicator should light on the front panel. At this step, the ethernet indicator (next to the power indicator) on your CPE radio should also light up.
- Confirm your first CPE is up and running by connecting to the Wi-Fi it provides! CPE routers will appear in your Network list as AltheaHome-2.4 and AltheaHome-5. The router’s password is also “ChangeMe”.
- Start these instructions over at step one, this time using CPE2 equipment.
Note: Though the CPE equipment should be quick and easy to connect, you may run into issues if the CPE radio is too close to the gateway AP radio. This equipment is rated for up to 15 miles and thus emits a “loud” signal that may be difficult for corresponding devices to interpret at close distances. We recommend keeping your CPE equipment at least 5’ away from the gateway devices during this process.
Althea Operator Tools
Now that your network has been assembled, check to make sure you can see both CPE devices from the Monitor tab of Ops Tools. Be sure to take a tour of Althea Operator Tools here as this will be a vital resource for monitoring and managing your new network!